
 Mini React 之JXS介绍及实现
# 1. 什么是JSX?
const element = <h1>Hello, world!</h1>;
JSX以类似模板语法的方式描述UI的一种语法。它是JS扩展语法,具有 JavaScript 的全部功能,可以在其中使用变量或表达式、函数等。它不能直接在浏览器运行,需要经过编译成标准的js语法才行。
# 2. 使用JSX的好处
React的重要特性之一就是声明式渲染,JSX是实现声明渲染途径,将DOM结构和逻辑 共同存放在称之为“组件”的松散耦合单元中,在视觉上有辅助作用。
# 3. JSX的本质
- JSX其实只是一种语法糖,最终会通过Babel (opens new window)转译成
React.createElement(type, props, children)语法 React.createElement会返回一个React元素(虚拟dom)- React元素事实上是普通的JS对象,用来描述你在屏幕上看到的内容
ReactDOM来确保浏览器中的真实DOM数据和React元素保持一致
JSX
<h1 className="title" style={{color:'red'}}>hello</h1>
转译后的代码:
React.createElement("h1", {
  className: "title",
  style: {
    color: 'red'
  }
}, "hello");
2
3
4
5
6
执行后返回的结果:
{
  type:'h1',
  props:{
    className: "title",
    style: {
      color: 'red'
    },
    children:"hello"
  }
}
2
3
4
5
6
7
8
9
10
# 4. 实现JSX
# 4.1 项目编译配置
配置打包编译和开发服务器
webpack.config.js
const path = require("path");
const HtmlWebpackPlugin = require("html-webpack-plugin");

const resolve = (dir) => path.resolve(__dirname, dir);

module.exports = {
  mode: "production",
  entry: resolve("main.js"),
  devtool: false,
  output: {
    path: resolve("dist"),
    filename: "index.js",
  },
  devServer: {
    static: resolve("public"),
    port: 3000,
    open: true,
  },
  module: {
    rules: [
      {
        test: /\.js$/,
        exclude: /node_modules/,
        use: {
          loader: "babel-loader",
        },
      },
    ],
  },
  plugins: [
    new HtmlWebpackPlugin({
      template: resolve("public/index.html"),
    }),
  ],
};
2
3
4
5
6
7
8
9
10
11
12
13
14
15
16
17
18
19
20
21
22
23
24
25
26
27
28
29
30
31
32
33
34
35
# 4.2 JSX实现过程
在main.js里编写如下代码:
main.js
import React from './src/index'

const jsxELe = <h1 className="some-name">hello world!</h1>;

console.log("jsxELe=>", jsxELe);
2
3
4
5
npx webpack serve启动开发服务器
发现webpack编译报错了:

原来是在没有装jsx插件的情况下,不能识别jsx语法,需要安装@babel/plugin-transform-react-jsx (opens new window)这个Babel插件对JSX语法糖进行转换。
pnpm install @babel/plugin-transform-react-jsx
安装好后配置插件:
.babelrc
{
  "plugins": ["@babel/plugin-transform-react-jsx"]
}
2
3
然后重启服务,可以看到编译没报错,能识别jsx语法了,但是浏览器运行报错了:
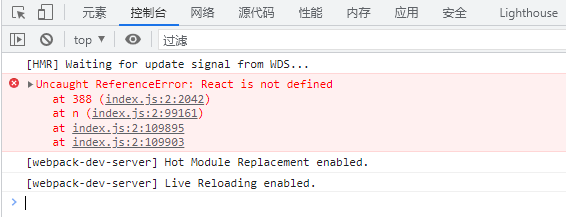
原因是JSX最终会编译成React.createElement()方法,我们还没有实现这个方法。我们在src/下面新建一个jsx.js文件,然后实现createElement()方法,最后src/index.js里面导入scr/jsx的createElement()方法并export出去:
src/jsx.js
export function createElement(type, props, children) {
  return {type, props, children}
}
2
3
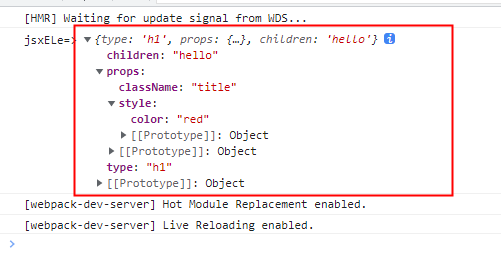
终于没有报错了!这时我们可以清晰的看到,我们写的jsx,最终经过编译,执行之后,得到的是一个描述真实dom的js对象,也就是我们常说的虚拟DOM。
# 4.3 增加虚拟DOM必要属性和处理子元素
当我们把main.js里的jsx改成了多层嵌套的时候,我们发现得到的虚拟dom对象都是在一个平面上:
const jsxELe = (
  <h1 className="title" style={{ color: "red" }}>
    h1:文本内容
    <span>span:文本内容</span>
    <div >
      <p>p:文本内容</p>
    </div>
  </h1>
);
2
3
4
5
6
7
8
9
得到的虚拟dom对象
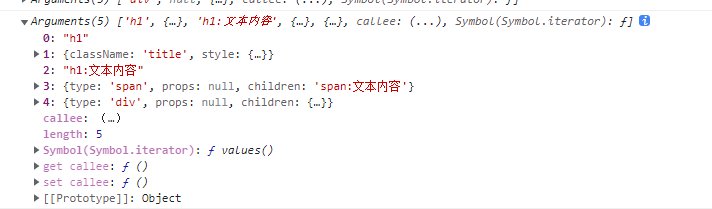
所以还要对后面的子节点进行children当初props处理,这很重要重要,因为涉及到后续渲染时,递归渲染子节点相关的逻辑。此外为了区分一个object是普通对象还是jsx虚拟DOM,我们还得在这个虚拟DOM上加$$typeof属性。把string和number基本类型包装成虚拟dom,然后还要加上key属性来标识每个虚拟dom对象,便于后面做diff处理。还有要加上ref属性,方便后面实现ref相关功能。代码如下:
在src下创建element.js,用于存放各种标识及常量
src/element.js:
export const REACT_ELEMENT = Symbol('react.element');
export const REACT_ELEMENT = Symbol('REACT_TEXT');
2
在src下创建utils.js,用于存放工具函数
src/utils.js:
import { REACT_TEXT } from "./element";
export function wrapToVdom(element) { // 将基本类型转成对象类型,为了方便后续的diff, react真实源码没有
  return typeof element === "string" || typeof element === "number"
    ? { type: REACT_TEXT, props: element }
    : element;
}
2
3
4
5
6
然后把 src/jsx.js 里面createElement()返回的虚拟dom对象做一些调整:
src/jsx.js
import { REACT_ELEMENT } from "./element";
import { wrapToVdom } from "./utils";

export function createElement(type, props, ...kids) {
  props = props || {}; // props可能为null
  props.children = kids.length === 1 ? wrapToVdom(kids[0]) : kids.map(wrapToVdom); // 把kids的基本元素包装成Vdom
  return {
    $$typeof: REACT_ELEMENT,
    type,
    ref: props.ref,
    key: props.key,
    props,
  };
}
2
3
4
5
6
7
8
9
10
11
12
13
14
测试一下,有这么一段jsx:
import React from "./src/index";

const jsxELe = (
  <h1 className="title" style={{ color: "red" }}>
    h1的文本内容
    <div onClick={() => alert("hi~")}>
      <p>p的文本内容</p>
    </div>
  </h1>
);

console.log("jsxELe=>", jsxELe);
2
3
4
5
6
7
8
9
10
11
12
我们来看一下它的输出结果:
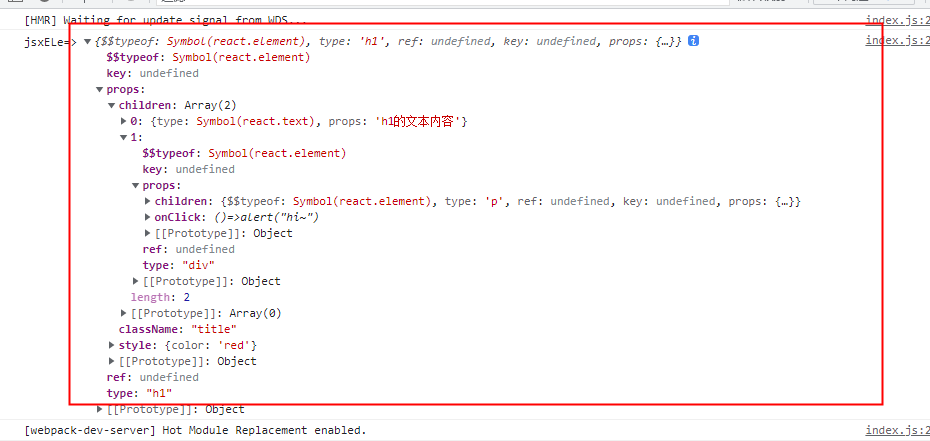
完美~,jsx已经基本实现了。下一节我们将学习如何把虚拟DOM渲染到页面上。
代码地址: https://github.com/sunnyxujian/mini-react